Angular 的 SDK 望远镜
用于Angular的Descope SDK为Angular上方撰写的应用程序提供了方便的Descope访问. 你可以读更多关于 望远镜网站。 。 。 .
所需资源
- SDK支持Angular版本16及以上.
- 望远镜
Project ID用于使用SDK。 硂т descope 控制台中的项目页面。 。 。 .
安装 SDK
以 :
npm i --save @descope/angular-sdk
向您添加查看镜类型定义 tsconfig.ts
  "compilerOptions": {
    "typeRoots": ["./node_modules/@descope"],
    <other options>
  }
使用量
NgModule - 导入 DescopeAuthModule 您的应用程序
app.module.ts
import { NgModule } from '@angular/core';
import { BrowserModule } from '@angular/platform-browser';

import { AppComponent } from './app.component';
import { DescopeAuthModule } from '@descope/angular-sdk';

@NgModule({
  declarations: [AppComponent],
  imports: [
    BrowserModule,
    DescopeAuthModule.forRoot({
      projectId: '<your_project_id>'
    })
  ],
  bootstrap: [AppComponent]
})
export class AppModule {}
独立模式 - 为您的应用程序配置 Descope SDK
main.ts
import { bootstrapApplication } from '@angular/platform-browser';
import { AppComponent } from './app/app.component';
import { DescopeAuthConfig } from '@descope/angular-sdk';

bootstrapApplication(AppComponent, {
  providers: [
    { provide: DescopeAuthConfig, useValue: { projectId: '<your_project_id>' } }
  ]
}).catch((err) => console.error(err));
使用演示镜来渲染特定流
你用得着 默认流量 或者说 提供流量 id 直接到分镜组件
1. 默认流量
app.component.html
<descope-sign-in-flow
        (success)="onSuccess($event)"
        (error)="onError($event)"
        (ready)="onReady()"
></descope-sign-in-flow>
<!-- Optionally, you can show/hide loading indication until the flow page is ready -->
<div
  *ngIf="isLoading"
  class="loading-indicator"
  style="display: flex; justify-content: center; align-items: center;"
>
  Loading...
</div>
app.component.ts
import { Component } from '@angular/core';

@Component({
  selector: 'app-root',
  templateUrl: './app.component.html'
})
export class AppComponent {
  // Optionally, you can show/hide loading indication until the flow page is ready
  // See usage in onReady() method and the html template
  isLoading = true;

  onSuccess(e: CustomEvent) {
    console.log('SUCCESSFULLY LOGGED IN', e.detail);
  }

  onError(e: CustomEvent) {
    console.log('ERROR FROM LOG IN FLOW', e.detail);
  }

  onReady() {
    this.isLoading = false;
  }
}
2. 提供流量标识
<descope
     flowId="<your_flow_id>"
     (success)="<your_success_function>"
     (error)="<your_error_function>"
<!-- theme can be "light", "dark" or "os", which auto select a theme based on the OS theme. Default is "light"
     theme="dark"

     locale can be any supported locale which the flow's screen translated to, if not provided, the locale is taken from the browser's locale.
     locale="en"

     debug can be set to true to enable debug mode
     debug="true"

     tenant ID for SSO (SAML) login. If not provided, Descope will use the domain of available email to choose the tenant
     tenant=<tenantId>

     Redirect URL for OAuth and SSO (will be used when redirecting back from the OAuth provider / IdP), or for "Magic Link" and "Enchanted Link" (will be used as a link in the message sent to the the user)
     redirectUrl=<redirectUrl>

     telemetryKey=<telemtry_key>

     autoFocus can be true, false or "skipFirstScreen". Default is true.
     - true: automatically focus on the first input of each screen
     - false: do not automatically focus on screen's inputs
     - "skipFirstScreen": automatically focus on the first input of each screen, except first screen
     autoFocus="skipFirstScreen"

    validateOnBlur can be true or false. Default is false.
     - true: Trigger input validation upon blur, in addition to the validation on submit
     - false: do not trigger input validation upon blur

    restartOnError can be true or false. Default is false.
     - true: In case of flow version mismatch, will restart the flow if the components version was not changed
     - false: Will not auto restart the flow in case of a flow version mismatch

     errorTransformer is a function that receives an error object and returns a string. The returned string will be displayed to the user.
     NOTE: errorTransformer is not required. If not provided, the error object will be displayed as is.
     Example:
     errorTransformer = (error: { text: string; type: string }): string => {
         const translationMap: { [key: string]: string } = {
             SAMLStartFailed: 'Failed to start SAML flow'
         };
         return translationMap[error.type] || error.text;
     };
     ...
     errorTransformer={errorTransformer}

    form is an object the initial form context that is used in screens inputs in the flow execution.
    Used to inject predefined input values on flow start such as custom inputs, custom attributes and other inputs.
    Keys passed can be accessed in flows actions, conditions and screens prefixed with "form.".
    NOTE: form is not required. If not provided, 'form' context key will be empty before user input.
    Example:
    form={{ email: "[email protected]",  firstName: "test", "customAttribute.test": "aaaa", "myCustomInput": 12 }}

    client is an object the initial client context in the flow execution.
    Keys passed can be accessed in flows actions and conditions prefixed with "client.".
    NOTE: client is not required. If not provided, context key will be empty.
    Example:
    client={{ version: "1.2.0" }}

    Use a custom style name or keep empty to use the default style.
    styleId="my-awesome-style"

    Set a CSP nonce that will be used for style and script tags.
    nonce="rAnd0m"

    Sets the expected origin for OAuth popup communication when redirect URL is on different origin than the main application. Required for cross-origin OAuth popup flows.
    popupOrigin="https://auth.example.com"

    Clear screen error message on user input.
    dismissScreenErrorOnInput=true

     logger is an object describing how to log info, warn and errors.
     NOTE: logger is not required. If not provided, the logs will be printed to the console.
     Example:
     const logger = {
        info: (title: string, description: string, state: any) => {
          console.log(title, description, JSON.stringify(state));
      },
        warn: (title: string, description: string) => {
          console.warn(title);
      },
        error: (title: string, description: string) => {
          console.error('OH NOO');
      },
     }
     ...
     logger={logger}-->
></descope>
onScreenUpdate
当出现新屏幕状态时, 并在每次呼叫后, 都会调用此功能 。 它得到以下参数:
screenName: 即将渲染的屏幕名称context: 包含即将到来的屏幕上下文的对象。 所有服务器制作的屏幕数据都生活在context.data。 。 。 .next: 当调用时继续流执行的函数ref: 提及去镜-wc节点
该函数可以是同步或async,并且应当返回布尔表示是否应该渲染自定义屏幕:
true: 渲染自定义屏幕false: 渲染默认流程屏幕
正在中断更改( v- next) : 服务器生成的用于直接显示的屏幕数据
context现在生活在context.data- 比如说.context.totp→context.data.totp, (中文(简体) ),context.inboundAppApproveScopes→context.data.inboundAppApproveScopes现状,form,和身份字段(user编号 :project编号 :lastAuth)住顶上. 见 @ descope/ web- 组件 README 完整清单context.data字段.
此功能允许渲染自定义屏幕而不是默认的流程屏幕. 对于高度定制化的 UI 或默认屏幕未覆盖的特定逻辑来说,它可能有用
为了制作自定义屏幕,其内容应作为儿童随附 descope 组件
用法示例:
function onScreenUpdate(screenName, context, next, ref) {
  if (screenName === 'My Custom Screen') {
    return true;
  }

  return false;
}
独立模式
Sdk中的所有组件都是独立的,因此可以通过直接导入到您的组件来使用.
使用 DescopeAuthService 及其已曝光的字段descopeSdk, (中文(简体) ), session$, (中文(简体) ), user$访问认证状态、用户细节和公用事业
这可能有助于实施应用程序特定逻辑. 实例:
- 如果当前会话被认证, 将不同组件渲染
- 渲染用户内容
- 注销按钮
app.component.html
<p *ngIf="!isAuthenticated"> You are not logged in</p>
<button *ngIf="isAuthenticated" (click)="logout()">LOGOUT</button>
<p>User: {{userName}}</p>
app.component.ts
import { Component, OnInit } from '@angular/core';
import { DescopeAuthService } from '@descope/angular-sdk';

@Component({
  selector: 'app-home',
  templateUrl: './app.component.html',
  styleUrls: ['./app.component.scss']
})
export class AppComponent implements OnInit {
  isAuthenticated: boolean = false;
  userName: string = '';
  claims?: Claims;

  constructor(private authService: DescopeAuthService) {}

  ngOnInit() {
    this.authService.session$.subscribe((session) => {
      this.isAuthenticated = session.isAuthenticated;
      this.claims = session.claims;
    });
    this.authService.user$.subscribe((descopeUser) => {
      if (descopeUser.user) {
        this.userName = descopeUser.user.name ?? '';
      }
    });
  }

  logout() {
    this.authService.descopeSdk.logout();
  }
}
会话刷新
DescopeAuthService 提供 refreshSession 财务报告和审定财务报表 refreshUser 方法,可以触发对Descope后端的单一请求,试图刷新会话或用户。 您需要刷新会话/ 用户时可以使用 。 例如,你可以使用 APP_INITIALIZER 提供方试图刷新每页的会话和用户刷新 :
app.module.ts
import { APP_INITIALIZER, NgModule } from '@angular/core';
import { BrowserModule } from '@angular/platform-browser';
import { AppComponent } from './app.component';
import { DescopeAuthModule, DescopeAuthService } from '@descope/angular-sdk';
import { zip } from 'rxjs';

export function initializeApp(authService: DescopeAuthService) {
  return () => zip([authService.refreshSession(), authService.refreshUser()]);
}

@NgModule({
  declarations: [AppComponent],
  imports: [
    BrowserModule,
    DescopeAuthModule.forRoot({
      projectId: '<your_project_id>'
    })
  ],
  providers: [
    {
      provide: APP_INITIALIZER,
      useFactory: initializeApp,
      deps: [DescopeAuthService],
      multi: true
    }
  ],
  bootstrap: [AppComponent]
})
export class AppModule {}
独立模式注释 :
你可以用同样的方法 APP_INITIALIZER 在独立模式下,将其添加到 providers 程序数组.
望远镜截取器
您还可以使用 DescopeInterceptor 尝试在 HTTP 请求中刷新会话 401 或者说 403 回应 :
app.module.ts
import { NgModule } from '@angular/core';
import { BrowserModule } from '@angular/platform-browser';
import { AppComponent } from './app.component';
import {
  HttpClientModule,
  provideHttpClient,
  withInterceptors
} from '@angular/common/http';
import { DescopeAuthModule, descopeInterceptor } from '@descope/angular-sdk';

@NgModule({
  declarations: [AppComponent],
  imports: [
    BrowserModule,
    HttpClientModule,
    DescopeAuthModule.forRoot({
      projectId: '<your_project_id>',
      pathsToIntercept: ['/protectedPath']
    })
  ],
  providers: [provideHttpClient(withInterceptors([descopeInterceptor]))],
  bootstrap: [AppComponent]
})
export class AppModule {}
DescopeInterceptor数字 :
- 为 urls 包含其中之一的请求而配置
pathsToIntercept. 如果不提供,它将用于所有请求. - 附加会话符号为
Authorization页眉在Bearer <token>格式 - 如果请求得到回复
401或者说403它会自动尝试刷新会话 - 如果刷新尝试成功, 它会自动重试原请求, 否则会因原错误而失败
对于更多的 SDK 使用示例参考 文档
会话令牌服务器验证( 通过会话令牌到服务器 API)
开发全存储应用程序时,通常会拥有需要有效会话符的私人服务器API:
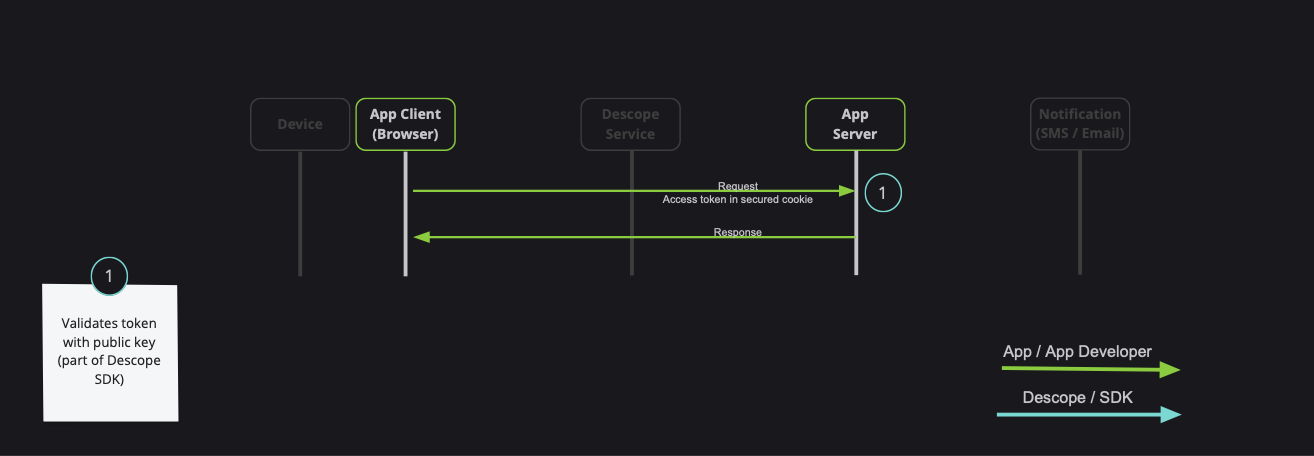
注:Descope还提供各种语言(NodeJS,Go,Python等)的服务器侧SDK. Descope的服务器SDKs有外出会话验证API,支持所描述的bellow选项. 欲了解更多会话验证,请读 本节 用于演示文稿文档.
通过使用 DescopeInterceptor 或手动添加令牌到您的请求中( 即使用 DescopeAuthService.getSessionToken() 帮助函数)
帮助函数
您还可以使用下列帮助方法: DescopeAuthService - 协助实施各种管理你的JWT的行动.
getSessionToken()- 获取当前会话符号.getRefreshToken()- 获取当前刷新标志。 注:只有在刷新令牌存储于本地存储时才相关. 如果刷新符号存储在httpOnly饼干,它会返回一个空弦.isAuthenticated()- 返回用户是否被认证布尔refreshSession- 使用现有的有效刷新符号强制更新当前会话符号.refreshUser- 使用现有的有效刷新令牌对当前用户强制更新.isSessionTokenExpired(token = getSessionToken())- 检查当前会话符号是否过期 。 如果不坚持, 则提供会话符号 .isRefreshTokenExpired(token = getRefreshToken())- 检查当前刷新符号是否过期 。 如果不坚持,则提供更新信号.getJwtRoles(token = getSessionToken(), tenant = '')- 从现有的会话符号中获取当前角色。 提供特定租户身份证明.getJwtPermissions(token = getSessionToken(), tenant = '')- 从现有会话符中选择当前权限。 为特定租户提供租户身份证明.getCurrentTenant(token = getSessionToken())- 从现有的会话代号(来自dct索赔要求).
刷新符号生命周期
扫描器 SDK 将自动刷新即将到期的会话符号 。 这是在背景中使用刷新符号完成的,没有附加任何配置.
如果配置了Descope项目设置, 以管理 cookie 中的令牌 .
您还必须配置自定义域,并将其设置为 baseUrl 内 DescopeAuthModule。 。 。 .
自动刷新会话符号
扫描器 SDK 会在会话符号即将到期时自动刷新它 。 这是在背景中使用刷新符号完成的,没有附加任何配置.
如果你想禁用这种行为,你可以通过 autoRefresh: false 页:1 DescopeAuthModule 模块。 这将阻止 SDK 自动刷新会话符号 .
NgModule 示例 :
import { NgModule } from '@angular/core';
import { BrowserModule } from '@angular/platform-browser';
import { AppComponent } from './app.component';
import { DescopeAuthModule } from '@descope/angular-sdk';

@NgModule({
  declarations: [AppComponent],
  imports: [
    BrowserModule,
    DescopeAuthModule.forRoot({
      projectId: '<your_project_id>',
      autoRefresh: false
    })
  ],
  bootstrap: [AppComponent]
})
export class AppModule {}
独立模式示例 :
import { bootstrapApplication } from '@angular/platform-browser';
import { AppComponent } from './app/app.component';
import { DescopeAuthConfig } from '@descope/angular-sdk';

bootstrapApplication(AppComponent, {
  providers: [
    {
      provide: DescopeAuthConfig,
      useValue: {
        projectId: '<your_project_id>',
        autoRefresh: false
      }
    }
  ]
}).catch((err) => console.error(err));
望远镜警卫
angular-sdk 为未认证的用户提供方便的路由守护,防止其访问指定路由:
import { NgModule } from '@angular/core';
import { RouterModule, Routes } from '@angular/router';
import { HomeComponent } from './home/home.component';
import { ProtectedComponent } from './protected/protected.component';
import { descopeAuthGuard } from '@descope/angular-sdk';
import { LoginComponent } from './login/login.component';

const routes: Routes = [
  {
    path: 'step-up',
    component: ProtectedComponent,
    canActivate: [descopeAuthGuard],
    data: { descopeFallbackUrl: '/' }
  },
  { path: 'login', component: LoginComponent },
  { path: '**', component: HomeComponent }
];

@NgModule({
  imports: [RouterModule.forRoot(routes, { enableTracing: false })],
  exports: [RouterModule]
})
export class AppRoutingModule {}
如果不经过认证的用户尝试访问受保护的路由,他们将被重定向到 descopeFallbackUrl
坚韧不拔
Descope存储了两个符号:会话符号和刷新符号.
- 刷新令牌或存储在本地存储中,或
httpOnly饼干 这是可配置的 在Descope控制台. - 会话代号被存储在本地存储或JS饼干中. 这种行为可以通过
sessionTokenViaCookie道具装入DescopeAuthModule模块.
然而,出于安全考虑,您可以选择不在浏览器中存储令牌. 在这种情况下,你可以通过 persistTokens: false 页:1 DescopeAuthModule 模块。 这使得SDK无法在浏览器中存储符.
注释:
- 您必须配置要存储在
httpOnly德望台的饼干 否则,刷新令牌将不会被存储,当页面被刷新后,用户会被登录出. - 您仍然可以使用
session观测到DescopeAuthService。 。 。 . - 会话符号饼干设定为
SameSite=Strict; Secure;默认. 如果您需要自定义, 您可以设置sessionTokenViaCookie={sameSite: 'Lax', secure: false, cookieName: 'MY_COOKIE'}。 。 。 .sameSite(默认 :Strict) – 控制会话饼干的SameSite属性.secure(默认 :true) – 如果真实, 将饼干设定为安全( 仅通过 HTTPS) .cookieName(默认 :DS) – 会话符号饼干的名称. 用于在同一域上运行多个Descope项目时避免冲突.domain(默认:自动检测) - 会话符号饼干的域名 。 如果没有指定,请使用来自Descope项目设置或当前域的域.
最后用户持久性
Descope将最后一个用户信息存储在本地存储中. 如果您想要禁用此特性, 您可以通过 storeLastAuthenticatedUser: false 页:1 DescopeAuthModule 模块。 请注意,如果这种行为被禁用,与最后认证用户相关的一些功能可能无法如预期的那样运行.
部件
部件是允许您曝光基于租户执行的管理特性的组件. 在某些情况下,您的客户可能需要独立执行管理行动的能力,从而减轻与您联系的必要性。 部件是一个功能,使您能够以模块化的方式将这些能力委托给客户.
重要说明:
- 要让用户能够使用部件,需要指定
Tenant Admin作用.
所有部件组件接受可选 locale 输入。 它可以是任何支持的部件屏幕被翻译到的地方;如果不提供,则取自浏览器的地方.
<user-management
  tenant="tenant-id"
  widgetId="user-management-widget"
  locale="en"
/>
用户管理
这个 UserManagement 部件将允许您在您的网站上嵌入一个用户表以查看并采取行动 .
部件让你:
- 创建新用户
- 编辑已有的用户
- 激活/ 禁用已有用户
- 重置现有用户密码
- 删除已有用户的密码
- 删除已有的用户
说明:
- 自定义字段也出现在表格中.
使用量
<user-management tenant="tenant-id" widgetId="user-management-widget" />
示例 管理用户
角色管理
这个 RoleManagement 部件会让您在您的站点内嵌入一个角色表以查看并采取行动 .
部件让你:
- 创建新角色
- 改变现有角色的字段
- 删除现有角色
说明:
- 这个
Editable字段是由用户对角色的访问决定的 - 意思是项目级角色不能被租户级用户编辑. - 您需要预先定义用户可以使用的权限, 这些权限不能在部件中编辑 .
使用量
<role-management tenant="tenant-id" widgetId="role-management-widget" />
示例 管理角色
访问关键管理
这个 AccessKeyManagement 部件会让您在您的站点内嵌入一个访问密钥表, 以查看并采取行动 .
部件让你:
- 创建新访问密钥
- 激活/关闭现有访问密钥
- 删除扩展访问密钥
使用量
<!-- admin view: manage all tenant users' access keys -->
<access-key-management
  tenant="tenant-id"
  widgetId="access-key-management-widget"
/>

<!-- user view: mange access key for the logged-in tenant's user -->
<access-key-management
  tenant="tenant-id"
  widgetId="user-access-key-management-widget"
/>
示例 管理访问密钥
审计管理
这个 AuditManagement 部件会让您在您的站点内嵌入一个审计表 .
使用量
<audit-management tenant="tenant-id" widgetId="audit-management-widget" />
示例 管理审计
用户Profile
这个 UserProfile 部件允许您在您的应用程序中嵌入用户配置文件组件, 并允许登录在用户中更新其配置文件 .
部件让你:
- 更新用户配置图
- 更新用户个人信息
- 更新认证方法
- 注销
使用量
<user-profile widgetId="user-profile-widget"
(logout)="<your_logout_function>"
/>
示例 我的用户配置
应用程序门户
这个 ApplicationsPortal 允许您在应用程序中嵌入一个应用程序门户组件,并允许登录用户打开分配给他们的应用程序.
使用量
<applications-portal widgetId="applications-portal-widget" />
示例 我的用户配置
OIDC 登录
Descope也支持OIDC登录. 要启用 OIDC 登录, 通过 oidcConfig 页:1 DescopeAuthConfig 配置 .
用 OIDC 配置
NG 模块
import { NgModule } from '@angular/core';
import { BrowserModule } from '@angular/platform-browser';
import { AppComponent } from './app.component';
import { DescopeAuthModule } from '@descope/angular-sdk';

@NgModule({
  declarations: [AppComponent],
  imports: [
    BrowserModule,
    DescopeAuthModule.forRoot({
      projectId: '<your_project_id>',
      oidcConfig: true // Enable OIDC with default settings
    })
  ],
  bootstrap: [AppComponent]
})
export class AppModule {}
独立模式
import { bootstrapApplication } from '@angular/platform-browser';
import { AppComponent } from './app/app.component';
import { DescopeAuthConfig } from '@descope/angular-sdk';

bootstrapApplication(AppComponent, {
  providers: [
    {
      provide: DescopeAuthConfig,
      useValue: {
        projectId: '<your_project_id>',
        oidcConfig: true // Enable OIDC with default settings
      }
    }
  ]
}).catch((err) => console.error(err));
自定义 OIDC 配置
{
  provide: DescopeAuthConfig,
  useValue: {
    projectId: '<your_project_id>',
    oidcConfig: {
      applicationId: 'my-application-id', // optional, if not provided, the default OIDC application will be used
      redirectUri: 'https://my-app.com/redirect', // optional, if not provided, the default redirect URI will be used
      scope: 'openid profile email', // optional, if not provided, default is openid email offline_access roles descope.custom_claims
    }
  }
}
使用输入应用程序作为 OIDC 提供者
要使用入境应用程序作为OIDC的提供者,您必须同时提供 issuer 财务报告和审定财务报表 clientId 配置选项。 这个 issuer 是 OIDC 权威 URL,并且 clientId 是您入境应用程序的客户身份 .
说明: 当将一个入境应用程序配置为 OIDC 提供者时, 您必须直接从 Descope 控制台中的入境应用程序设置页面获取发行器 URL 。 发行者 URL 是您输入的应用程序配置所特有的, 无法手动构建 。 此外,您还需要从相同的入境应用程序设置中提供客户端ID.
{
  provide: DescopeAuthConfig,
  useValue: {
    projectId: '<your_project_id>',
    oidcConfig: {
      // Required: Get this from your inbound app settings page
      issuer: 'https://api.descope.com/v1/apps/P1234567890',
      // Required: Client ID from your inbound app settings
      clientId: 'your-inbound-app-client-id',
      // Optional: Custom redirect URI (defaults to current URL)
      redirectUri: 'https://my-app.com/redirect',
      // Optional: Custom scope (defaults to 'openid' when issuer is provided)
      scope: 'openid profile email',
    }
  }
}
使用自定义时 issuer 默认范围为 'openid' 而不是整个Descope范围。 您可以通过提供自定义来覆盖此功能 scope 数值.
使用 OIDC 登录
配置 OIDC 后,您可以使用 oidc.loginWithRedirect 方法从 DescopeAuthService数字 :
import { Component } from '@angular/core';
import { DescopeAuthService } from '@descope/angular-sdk';

@Component({
  selector: 'app-login',
  template: '<button (click)="login()">Login with OIDC</button>'
})
export class LoginComponent {
  constructor(private descopeAuthService: DescopeAuthService) {}

  login() {
    this.descopeAuthService.descopeSdk.oidc.loginWithRedirect({
      // By default, the login will redirect the user to the current URL
      // If you want to redirect the user to a different URL, you can specify it here
      redirect_uri: window.location.origin
    });
  }
}
正在完成 OIDC 登录
在用户以 OIDC 代码和状态查询参数重定向回您的应用程序后, 调用 finishLoginIfNeed() 以完成登录 :
import { Component, OnInit } from '@angular/core';
import { DescopeAuthService } from '@descope/angular-sdk';

@Component({
  selector: 'app-callback',
  template: '<div>Processing login...</div>'
})
export class CallbackComponent implements OnInit {
  constructor(private descopeAuthService: DescopeAuthService) {}

  async ngOnInit() {
    // This will automatically finish the login if OIDC parameters are present
    await this.descopeAuthService.descopeSdk.oidc.finishLoginIfNeed();
  }
}
代码示例
您可以在其中找到一个示例 angular app 示例文件夹。 。 。 .
设置
运行示例, 创建 environment.development.ts 文件输入 environments 文件夹.
import { Env } from './conifg';

export const environment: Env = {
  descopeProjectId: '<your_project_id>'
};
在 望远镜控制台。 。 。 .
运行示例
在项目根部运行以下命令来构建和运行示例 :
pnpm i && npm start
示例可选条目变量
应用软件的定制环境变量见下表:
| 信封变量 | 说明 | 默认值 |
|---|---|---|
| 缩放 | 登录页面中要使用的流程 ID | 注册或注册 |
| 望远镜BaseUrl | 自定义查看镜基址 | 无 |
| 望远镜BaseStaticUrl | 自定义底盘静态 URL | 无 |
| 望远镜主题 | 流程主题 | 无 |
| 地镜 | 流动地盘 | 浏览器的语言 |
| 瞄准镜 | OAuth/SSO/ Magic Link/ 智能链接的流程重定向 URL | 无 |
| 望远镜天花板 | SSO/SAML 流动租户身份证 | 无 |
| 调试模式 | "对" - 启用调试器 假话 - 禁用流量调试器 | 无 |
| 分镜 | 升级流程 ID 以显示登录用户( 通过按钮) 。 如"上". 如果不提供按钮将隐藏 | 无 |
| 显微镜键 | 字符串 - Descope公司提供的遥测公用钥匙 | 无 |
| 望远镜后端Url | 如果您想要测试 e2e, 请使用您的测试后端应用 | 无 |
示例 environment.development.ts 文件 :
import { Env } from './conifg';

export const environment: Env = {
  descopeProjectId: '<your_project_id>',
  descopeBaseUrl: '<your_base_url>',
  descopeBaseStaticUrl: '<your_base_static_url>',
  descopeFlowId: 'sign-up-or-in',
  descopeDebugMode: false,
  descopeTheme: 'os',
  descopeLocale: 'en_US',
  descopeRedirectUrl: '<your_redirect_url>',
  descopeTelemetryKey: '<your_telemetry_key>',
  descopeStepUpFlowId: 'step-up',
  descopeBackendUrl: 'http://localhost:8080/protected'
};
解决问题
如果在构建应用程序时遇到警告:
▲ [WARNING] Module 'lodash.get' used by 'node_modules/@descope/web-component/node_modules/@descope/core-js-sdk/dist/index.esm.js' is not ESM
添加 lodash.get 允许在 angular.json
"architect": {
    "build": {
        "builder": "@angular-devkit/build-angular:browser",
        "options": {
            "allowedCommonJsDependencies": ["lodash.get"],
            <other_options>
        }
        <other_config>
    }
    <other_config>
}
财务问题
我在后端更新了用户, 但用户 / 会话符不在前端更新
Descope SDK在前端缓存用户和会话符号. 如果您在后端更新用户( 例如使用Descope Management SDK/ API), 您可以调用 me 编号 : refresh 从 descopeSdk 成员 DescopeAuthService 以刷新用户和会话符号。 示例
import { DescopeAuthService } from '@descope/angular-sdk';

export class MyComponent {
  // ...
  constructor(private authService: DescopeAuthService) {}

  handleUpdateUser() {
    myBackendUpdateUser().then(() => {
      this.authService.descopeSdk.me();
      // or
      this.authService.descopeSdk.refresh();
    });
  }
}
学习更多
学习更多 请看 视角文档和 API 参考页面。 。 。 .
联系我们
如果您需要帮助, 您可以发送电子邮件 瞄准镜支持
许可证
Angular的SDK探测器获得许可,可在下列条件下使用: 麻省理工学院许可证协议。 。 。 .