⚠️
@frsource/cypress-plugin-visual-regression-diff已贬值.插件已移动到 像素一样 现予公布
@pixsame/cypress-plugin-visual-regression-diff。旧软件包不会获得新功能. 搬家只是重名,你看 下级。 。 。 .
从 @frsource 软件包
第1.0.0版 翻译 @pixsame/cypress-plugin-visual-regression-diff 代码为 @frsource/cypress-plugin-visual-regression-diff 4.2.1 没有行为改变,所以你的基线图像,配置和 cy.* 命令继续运行.
迁移的最快速方式是内置命令,它重新命名每个 package.json 在当前目录下方, 更新您的配置和辅助文件中的导入和输入引用, 并重新安装它找到的软件包管理器 :
npx @frsource/cypress-plugin-visual-regression-diff migrate
它列出它会更改的文件,并在写东西之前询问. 过 --dry-run 只看到名单, --yes 跳过问题(在CI中需要)和 --no-install 以跳过安装步骤.
喜欢用手吗? 交换包并替换导入中的名称:
npm uninstall @frsource/cypress-plugin-visual-regression-diff
npm install --save-dev @pixsame/cypress-plugin-visual-regression-diff
-import '@frsource/cypress-plugin-visual-regression-diff';
+import '@pixsame/cypress-plugin-visual-regression-diff';
-import { initPlugin } from '@frsource/cypress-plugin-visual-regression-diff/plugins';
+import { initPlugin } from '@pixsame/cypress-plugin-visual-regression-diff/plugins';
如果您将软件包列表到 compilerOptions.types 页:1 tsconfig.json并重命名为那里.






Cypress - 视觉后退 Diff 插件
使用一个很好的图形界面进行视觉回归测试作为帮助 。 @ @ info 只给Cypress! E2e 和组件测试兼容性
移动
• 妇女
开始
• 妇女
使用量
• 妇女
财务问题
• 妇女
文件问题
• 妇女
有问题或想法吗?
提供平滑体验的视觉回归测试插件 :
指定测试失败的阈值.
快速在 Cypress UI 中直接预览旧和新截图 .
使用 diff 图像查找视觉变化 .
作为可摇摆的捆绑品出版,单独供JS ES5或现代捆绑商使用 微捆绑。 。 。 .
与每个捆绑者合作(在网络包装、活字、卷起等测试),
提供完整的打字方式 类型标记。 。 。 .

开始
安装
您可以使用您最喜欢的软件包管理器安装此库 :
# npm
npm install --save-dev @pixsame/cypress-plugin-visual-regression-diff

# yarn
yarn add -D @pixsame/cypress-plugin-visual-regression-diff

# pnpm
pnpm add -D @pixsame/cypress-plugin-visual-regression-diff
下一步, 您需要导入库 :
- 首先,在您的支持文件中(默认位置位于
cypress/support/index.js:
// typescript / ES6
import '@pixsame/cypress-plugin-visual-regression-diff';

// javascript
require('@pixsame/cypress-plugin-visual-regression-diff');
- 第二点:
- (用于 Cypress 10.0+) 中
cypress.config.js(或cypress.config.ts:
- (用于 Cypress 10.0+) 中
// typescript / ES6
import { defineConfig } from 'cypress';
import { initPlugin as initVisualRegressionPlugin } from '@pixsame/cypress-plugin-visual-regression-diff/plugins';

export default defineConfig({
  // initPlugin must be called in the section where it is used: e2e or component
  e2e: {
    setupNodeEvents(on, config) {
      initVisualRegressionPlugin(on, config);
    },
  },
  component: {
    setupNodeEvents(on, config) {
      initVisualRegressionPlugin(on, config);
    },
  },
});
- (对于 Cypress < 0.0) 在您的插件文件中(默认位置位于
cypress/plugins/index.js:
// typescript / ES6
import { initPlugin as initVisualRegressionPlugin } from '@pixsame/cypress-plugin-visual-regression-diff/plugins';

export default function (
  on: Cypress.PluginEvents,
  config: Cypress.PluginConfigOptions,
) {
  initVisualRegressionPlugin(on, config);

  return config;
}

// javascript
const {
  initPlugin: initVisualRegressionPlugin,
} = require('@pixsame/cypress-plugin-visual-regression-diff/plugins');

module.exports = function (on, config) {
  initVisualRegressionPlugin(on, config);

  return config;
};
就是这样,现在让我们看看怎么用图书馆 使用部分。 。 。 .
使用量
安装后, 库可能会被用在您的测试中 :
cy.get('.an-element-of-your-choice').matchImage();
或者,如果你想对整个文件作一截图:
cy.matchImage();
matchImage 命令将进行截图,并将其与先前运行的图像进行比较。 如果出现回归,测试会失败,你会得到"参见比较"按钮来查看问题的根源.
示例
安装还有问题吗? 来看看 此 repo 示例目录 来查看此插件如何在您的工程中的 e2e 或组件测试 Cypress 环境中使用.
自动清理未使用的图像
有用的是去掉由视觉回归插件产生的被任何测试不再使用的截图. 通过曝光变量启用此特性并享受释放的存储空间 QQ:
# Cypress 15.10+
npx cypress run --expose "pluginVisualRegressionCleanupUnusedImages=true"
# Cypress <15.10 (deprecated in 15.10, removed in 16)
npx cypress run --env "pluginVisualRegressionCleanupUnusedImages=true"
配置
配置插件 :
- 作为参数传递到
matchImage命令 :
cy.matchImage({
  // screenshot configuration, passed directly to the the Cypress screenshot method: https://docs.cypress.io/api/cypress-api/screenshot-api#Arguments
  // default: { }
  screenshotConfig: {
    blackout: ['.element-to-be-blackouted'],
  },
  // pixelmatch options, see: https://www.npmjs.com/package/pixelmatch#pixelmatchimg1-img2-output-width-height-options
  // default: { includeAA: true }
  diffConfig: {
    threshold: 0.01,
  },
  // whether to create missing baseline images automatically
  // default: true
  createMissingImages: false,
  // whether to update images automatically - useful for CI
  // - true: overwrite all baseline images without comparing (fastest)
  // - 'failures-only': compare first, update baseline only when diff exceeds threshold
  // - false: never update baseline images automatically
  // default: false
  updateImages: true,
  // directory path in which screenshot images will be stored
  // relative path are resolved against project root
  // absolute paths (both on unix and windows OS) supported
  // path separators will be normalised by the plugin depending on OS, you should always use / as path separator, e.g.: C:/my-directory/nested for windows-like drive notation
  // There are one special variable available to be used in the path:
  // - {spec_path} - relative path leading from project root to the current spec file directory (e.g. `/src/components/my-tested-component`)
  // default: '{spec_path}/__image_snapshots__'
  imagesPath: 'this-might-be-your-custom/maybe-nested-directory',
  // maximum threshold above which the test should fail
  // default: 0.01
  maxDiffThreshold: 0.1,
  // forces scale factor to be set as value "1"
  // helps with screenshots being scaled 2x on high-density screens like Mac Retina
  // default: true
  forceDeviceScaleFactor: false,
  // title used for naming the image file
  // default: Cypress.currentTest.titlePath (your test title)
  title: `${Cypress.currentTest.titlePath.join(' ')} (${Cypress.browser.displayName})`,
  // pass a path to custom image that should be used for comparison
  // instead of checking against the image from previous run
  // default: undefined
  matchAgainstPath: '/path/to/reference-image.png',
});
- 通过 全球曝光配置 (简体中文). 配置密钥名称与上方配置对象的密钥相同, 但已添加
pluginVisualRegression前缀,例如:
# Cypress 15.10+
npx cypress run --expose "pluginVisualRegressionUpdateImages=true,pluginVisualRegressionDiffConfig={\"threshold\":0.01}"
# Cypress <15.10 (deprecated in 15.10, removed in 16)
npx cypress run --env "pluginVisualRegressionUpdateImages=true,pluginVisualRegressionDiffConfig={\"threshold\":0.01}"
在一个旗帜中通过几个选项,用逗号分隔. 何时 --expose (或 --env)是重复的,Cypress只保留了最后的发生.
// cypress.config.ts (Cypress 15.10+)
import { defineConfig } from 'cypress';

export default defineConfig({
  expose: {
    pluginVisualRegressionUpdateImages: true,
    pluginVisualRegressionDiffConfig: { threshold: 0.01 },
  },
});
// cypress.config.ts (Cypress <15.10, deprecated in newer versions)
import { defineConfig } from 'cypress';

export default defineConfig({
  env: {
    pluginVisualRegressionUpdateImages: true,
    pluginVisualRegressionDiffConfig: { threshold: 0.01 },
  },
});
对于更多设置曝光变量的方法 看这里。 。 。 .
批量审查模式
批量审查 模式允许您运行一个完整的测试套件,而不停止第一次视觉diff故障. 相反,所有失败的快照都是在测试完成后在互动审查UI中收集并呈现的——这样你就可以批准或跳过批量修改.
在标题模式下增加(非CI环境)
启用时,在Cypress测试跑道的右下角会出现一个浮动动作按钮(FAB). 随着测试的进行:
- 无论何时
matchImage()调用超过 diff 阈值, FAB 增量的计数徽章而不是立即出错. - 一旦所有测试完成,就会出现一个与全部失败计数相关的错误.
- 点击 FAB 打开一款旋转木马,您可以同时检查每张失败的快照(新旧)以及其中之一 替换 基线或 跳过 改变.
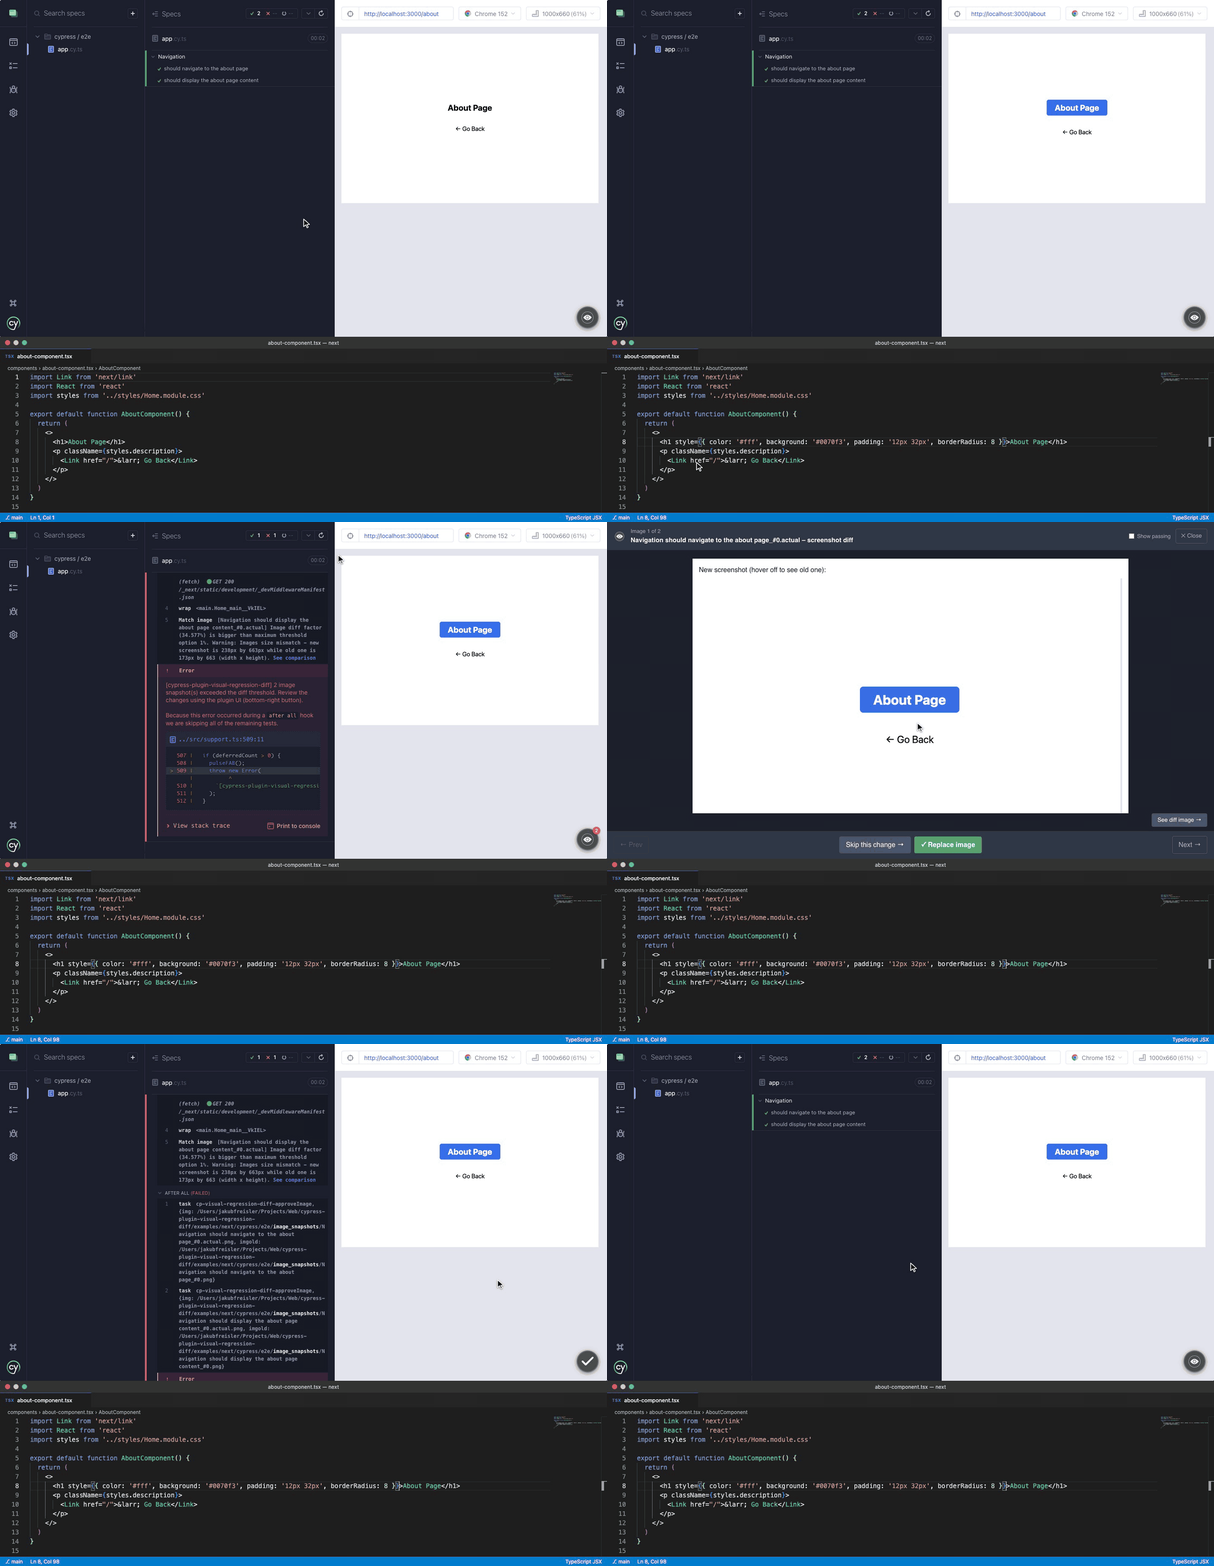
注意:批次模式会成为下一个主要版本的默认. 为了保持旧行为,确保设置配置属性到
false(详见下文).
如何启用
批量审查 模式是一个全局选项( 无法传递到 matchImage 页:1 启用它与 pluginVisualRegressionBatchReviewMode 键 :
# Cypress 15.10+
npx cypress open --expose "pluginVisualRegressionBatchReviewMode=true"
# Cypress <15.10 (deprecated in 15.10, removed in 16)
npx cypress open --env "pluginVisualRegressionBatchReviewMode=true"
// cypress.config.ts (Cypress 15.10+)
import { defineConfig } from 'cypress';

export default defineConfig({
  expose: {
    pluginVisualRegressionBatchReviewMode: true,
  },
});
// cypress.config.ts (Cypress <15.10, deprecated in newer versions)
import { defineConfig } from 'cypress';

export default defineConfig({
  env: {
    pluginVisualRegressionBatchReviewMode: true,
  },
});
审查过往图像
与基线不同的图像,但保持在内 maxDiffThreshold 不要失败测试, 但是它们仍然被收集。 旋转木马有一个 显示通过 复选框,允许您浏览它们(每个框都有标记) passed 并更换基线,例如消除小的累积漂移.
复选框默认不受限制 。 使用 pluginVisualRegressionBatchReviewModeShowPassingImages 键以默认方式检查 :
# Cypress 15.10+
npx cypress open --expose "pluginVisualRegressionBatchReviewMode=true" --expose "pluginVisualRegressionBatchReviewModeShowPassingImages=true"
# Cypress <15.10 (deprecated in 15.10, removed in 16)
npx cypress open --env "pluginVisualRegressionBatchReviewMode=true,pluginVisualRegressionBatchReviewModeShowPassingImages=true"
// cypress.config.ts (Cypress 15.10+)
import { defineConfig } from 'cypress';

export default defineConfig({
  expose: {
    pluginVisualRegressionBatchReviewMode: true,
    pluginVisualRegressionBatchReviewModeShowPassingImages: true,
  },
});
浏览器的本地存储中会记住在运行中选择复选框, 并优先于后续运行中配置的值 .
财务问题
为什么截图不符合我的Cypress配置中的 " Viewport " 设定?
Cypress中的屏幕截图默认不会缩放到取景口大小. 您可以改变这个行为 :
- 全球范围, 通过更改默认截图配置 :
Cypress.Screenshot.defaults({ capture: 'viewport' }); - 通过直接将截图配置传递到本地
.matchImage命令 :cy.matchImage({ screenshotConfig: { capture: 'viewport' } });
我已经升级了这个插件的版本,我的基线图像都自动更新了. 为什么?
有时我们需要在图像比较或图像生成算法上做一个突破性的改变. 要为您提供最简单的升级路径 - 插件自动更新您的基线图像 。 插件升级后, 把它们交到你的仓库, 你可以走了 !
屏幕截图不同 cypress run 财务报告和审定财务报表 cypress open我该怎么修?
这通常由无头模式和有头模式之间的设备像素比差异所造成. 使用 forceDeviceScaleFactor 选项,使比额表因数正常化到 1数字 :
cy.matchImage({ forceDeviceScaleFactor: true });
或者通过曝光变量在全球设定:
# Cypress 15.10+
npx cypress run --expose "pluginVisualRegressionForceDeviceScaleFactor=true"
# Cypress <15.10 (deprecated in 15.10, removed in 16)
npx cypress run --env "pluginVisualRegressionForceDeviceScaleFactor=true"
对于持续存在的视图大小差异,请考虑在 setupNodeEvents数字 :
on('before:browser:launch', (browser, launchOptions) => {
  if (browser.name === 'chrome' && browser.isHeadless) {
    launchOptions.args.push('--window-size=1280,720');
  }
  return launchOptions;
});
我如何与 Cypress 其他同时注册的插件一起使用此插件 setupNodeEvents 事件?
Cypress只支持每个事件一个处理器. 如果多个插件注册同一事件(例如. after:screenshot),只有最后一个会被调用. 要安全地组成多个插件, 请使用 cypress-on-fix数字 :
import { defineConfig } from 'cypress';
import { initPlugin as initVisualRegressionPlugin } from '@pixsame/cypress-plugin-visual-regression-diff/plugins';
import fix from 'cypress-on-fix';

export default defineConfig({
  e2e: {
    setupNodeEvents(on, config) {
      const fixedOn = fix(on);
      initVisualRegressionPlugin(fixedOn, config);
      // register other plugins using fixedOn here
    },
  },
});
我该如何与装入截图影像的摩卡威斯人或其他记者融合?
插件在默认值外存储基线图像 cypress/screenshots/ 目录。 一些记者(如: cypress-mochawesome-reporter)期望截图会出现在文件夹中.
使用 processImgPath 任务钩钩以控制截图文件的位置。 覆盖它英寸 setupNodeEvents 打电话后 initPlugin数字 :
setupNodeEvents(on, config) {
  initVisualRegressionPlugin(on, config);

  // Override the path processor to keep screenshots accessible to the reporter
  on('task', {
    'cp-visual-regression-diff-processImgPath': ({ path }: { path: string }) => {
      // return a new path, or the same path to keep default behavior
      return path;
    },
  });
}
如何在视觉差异上失败,无论多么小?
设定 maxDiffThreshold 改为 0数字 :
cy.matchImage({ maxDiffThreshold: 0 });
或全球通过曝光变量:
# Cypress 15.10+
npx cypress run --expose "pluginVisualRegressionMaxDiffThreshold=0"
# Cypress <15.10 (deprecated in 15.10, removed in 16)
npx cypress run --env "pluginVisualRegressionMaxDiffThreshold=0"
在成功图像比较后, 实际截图为何被删除 ?
当图像匹配时 .actual.png 文件是临时的,在比较后被清理。 只保留基线图像(无后缀). 这样可以避免存储冗余文件.
当图像不匹配时 .actual.png 文件被保存并带有与基线图像相同的插件元数据。 您可以在基线上安全重命名或复制( 例如在打开有更新基线的 PR 的 CI 工作) —— 插件会将其作为最新的基线处理, 并且不会在下次运行时重写 .
如果需要真实的截图才能为记者保持无障碍(例如. cypress-mochawesome-reporter),使用 processImgPath 任务钩钩以控制屏幕截图的存储位置。 见 我该如何与装入截图影像的摩卡威斯人或其他记者融合?
如何从截图文件名中删除空格 ?
屏幕截图文件名来源于 Cypress 测试标题,其中可能包含空格. 要使用没有空格的文件名, 请通过自定义 title 每个选项 matchImage 电话 :
cy.matchImage({ title: 'my-screenshot-without-spaces' });
在全球适用于所有人 matchImage 调用, 覆盖支持文件中的命令 (cypress/support/commands.ts:
Cypress.Commands.overwrite('matchImage', (originalFn, subject, options = {}) =>
  originalFn(subject, {
    title: Cypress.currentTest.titlePath.join(' ').replace(/\s+/g, '-'),
    ...options,
  }),
);
如何在图像文件名中包含浏览器名称( 用于交叉浏览器测试) ?
不同的浏览器可能会使字体和元素略有不同. 为保持每个浏览器分别的基线图像, 覆盖 matchImage 在您的支持文件中( e)cypress/support/commands.ts)设置特定浏览器 imagesPath数字 :
Cypress.Commands.overwrite('matchImage', (originalFn, subject, options = {}) =>
  originalFn(subject, {
    imagesPath: `{spec_path}/__image_snapshots__/${Cypress.browser.name}`,
    ...options,
  }),
);
这每个浏览器会创建单独的图像目录(例如. __image_snapshots__/chrome/, (中文(简体) ), __image_snapshots__/firefox/) (中文(简体) ).
如何生成显示基线、 diff 和实际图像的 HTML 报告 ?
插件在 Cypress UI 中提供了内置的可视化对比-在失败的测试上点击"参见比较"显示基线,diff,以及实际图像并存.
对于 CI 或可修饰的 HTML 报告,请与诸如 cypress-mochawesome-reporter。见 我该如何与装入截图影像的摩卡威斯人或其他记者融合? 关于设置细节.
商业支助
插件是免费和麻省理工学院许可的,它保持这样. 也有一个人在他的空余时间维护着它,所以如果你的团队在问题追踪器上需要比最佳的答案还要多,这里我提供:
- 设置和迁移,固定价格. 我让插件(或它的GitHub App)运行在你的CI中,整理出"我的Mac上的工作,在Linux上失败"的基线,并交出一个短写. 通常一到两天.
- 优先支持,每月一次. 一个私人频道,一个工作日内的反应, 和你的问题 在堆起的顶端。 覆盖插件,显示工具和 GitHub App .
- 特色工作和咨询,小时. 缺少一个选项,一个适配器 你的跑者, 或只是一个小时 看看为什么你的截图漂移.
写到 翻译: 和一句话 关于你的陷害, 我会回答的引文。 如果您只想表达感谢,本寄存器上方的赞助者按钮会这样做(GitHub赞助者,Patreon或Buy Me a Coffee),每个赞助者都在发行笔记中列出.
安全问题有自己的途径: 警卫。 。 。 .
问 题
不要犹豫 讨论委员会来啊!
更改日志
每一版本的更改记录在 发布注释 财务报告和审定财务报表 每个软件包的 ChangGELOG 文件。 。 。 .
许可证
版权(c) 2021年至今,Jakub FRS 弗赖斯勒, 资源