视频索引器部件


此 repo 包含 Video Indexer 部件包 。 下面可以找到有关如何使用这些棋子的文件和示例.
导言
Azure AI 视频索引器 azure AI服务(例如:面相、翻译、Azure AI Vision和发言)。 它使你能够利用Azure AI Video Indexer视频和音频模型从你的视频中提取洞察力.
本寄存器中的材料旨在帮助将视频索引器部件嵌入到您自己的服务中,并自定义其风格和数据.
软件包支持两类透视部件:
- 标准视频索引器部件
- 可定制的透视部件 - 允许您充分灵活和定制以满足您的业务需要 .
下面你可以看到关于:
我们的样本和执行细节也存在于我们 官员 GitHub。 。 。 .
安装视频索引器部件包
这些部件作为国家防范机制的一揽子文件分发。 安装库有几种方法:
-
利用国家预防机制安装 - 为了直接消耗国家防范机制软件包,你可以使用npm命令安装.
npm install @azure/video-indexer-widgets -
使用 CDN 导入 - 您可以使用以下剪接器直接将最新版本的部件导入到您的 HTML 文件 -
... <script type="module" src="https://unpkg.com/@azure/video-indexer-widgets"></script> </body> </html> -
如果您想要在窗口上曝光部件代码, 您可以使用以下片段导入最新版本 -
        ...
        <script src="https://unpkg.com/@azure/video-indexer-widgets@latest/dist/global.min.js"></script>
    </body>
</html>
嵌入标准视频索引器透视元件
这个软件包没有添加一个iframe元素来嵌入透视元件,而是允许您使用JS代码嵌入. 具体内容如下:
- 如何在您的应用程序中添加透视部件
- 显示部件使用情况的样本
创建透视组件
透视部件在运行时创建 。 部件将根据您提供的容器创建 .
使用软件包运行时创建 :
   const widget = new window.vi.widgets.Insights(
       '<container-id>',
       <widget-option-object>,
       <widget-configuration>
   );
请审查一下我们 官员 GitHub 查找更多关于所涉界面和课程的信息.
代码样本
此代码显示在 Javascript 代码运行时如何创建部件 .
<script>
    function onPackageLoad() {
        // Create widget config
        const config = {
            accountId: '<ACCOUNT-ID>',
            videoId: '<VIDEO-ID>',
            accessToken: '' // Add access token only if your video is private
        };
        let widget = new window.vi.widgets.Insights(
            'widget-container',
            {
                height: 780,
                width: 580
            },
            config
        );

        widget.render();
    }
</script>
<script src="https://unpkg.com/@azure/video-indexer-widgets@latest/dist/global.min.js" onload="onPackageLoad()"></script>
<body>
    <div id="widget-container"></div>
</body>
字体示例 - 说吧
在下面的例子中,我们创建了一个有洞察力的部件,与西班牙本地化. 所选的分页是时间线,所选的组件是情感,情感,笔录和关键词. 最初的搜索参数是"你好".
    import {
        IInsightsWidgetConfig,
        InsightsWidget
    } from '@azure/video-indexer-widgets';

    const config: IInsightsWidgetConfig = {
        accountId: '<ACCOUNT-ID>',
        videoId: '<VIDEO-ID>',
        accessToken: '<ACCESS-TOKEN>',
        locale: 'es-es',
        tab: 'timeline',
        search: 'hello',
        components: ['emotions', 'sentiments', 'transcript', 'keywords']
    };

    const insightsWidget = new InsightsWidget(
        'container',
        {
            height: 780,
            width: 580
        },
        config
    );

    insightsWidget.render();
嵌入自定义的视频索引器
嵌入 Video Indexer 有嵌入式视频原始数据的透视元件,结合了您自己的自定义数据和原始 Video Indexer 数据. 下节列出一些细节:
- 如何在您的应用程序中添加自定义透视部件
- 显示部件使用情况的样本
创建自定义透视部件
自定义透视部件在运行时创建 .
使用软件包运行时创建 :
   const widget = new window.vi.widgets.CustomInsights(
       '<container-id>',
       <widget-option>,
       <widget-configuration>
   );
请审查一下我们 官员 GitHub 查找更多关于所涉界面和课程的信息.
代码样本数字 :
此代码显示如何在运行时使用 JavaScript 代码创建通用自定义透视部件 :
<script>
    function onPackageLoad() {
        // Create widget config
        const config = {
            duration: <duration>,
            accountId: '<VI-ACCOUNT-ID>',
            videoId: '<VI-VIDEO-ID>',
            viInsightsKeys: <insights-key-list-array>,
            rawInsightsData: <raw-insights-data-array>,
            customData: <custom-data-array>
        };
        let widget = new window.vi.widgets.CustomInsights(
            'widget-container',
            {
                height: 780,
                width: 580
            },
            config
        );

        widget.render();
    }
</script>
<script src="https://unpkg.com/@azure/video-indexer-widgets@latest/dist/global.min.js" onload="onPackageLoad()"></script>
<body>
    <div id="widget-container"></div>
</body>
字体示例数字 :
此代码显示如何在运行时创建自定义的透视部件 .
在下面的例子中, 我们在运行时使用部件支持的所有数据类型创建自定义的透视部件 .
- 视频持续时间为634秒
- 该部件将显示由Video Indexer视频提供的品牌、关键词、场景和块(根据提供的账户+视频ID)。 视频是公开的,因为没有提供访问标志.
- 该部件将有两个原始的洞察数据。 情感和话题.
- 部件将有两个自定义的数据组件 。 一个作为胶囊,另一个颜色图.
    import {
        ICustomInsightsWidgetConfig,
        CustomInsightsWidget,
        VIInsightsKey,
        IEmotion,
        ITopic,
        IVRawIInsightsData,
        ICustomElement,
        ICustomData,
        ICustomColorElement
    } from '@azure/video-indexer-widgets';

    /**
    *    Using data from Video Indexer video parameters
    **/
    // VI account ID
    const viAccountID = '00000000-0000-0000-0000-000000000000'
    // VI video ID
    const viVideoID = 'd9d4860279'
    // VI insights key list.
    const viInsightsKeys : VIInsightsKey[] =  ['brands', 'keywords', 'scenes', 'blocks'];


    /**
    *    Using raw Video Indexer insights parameters
    **/
   // Using raw emotions data, with two emotions - one is Joy and other is Sad.
   const emotionsList: IEmotion[] [
            {
                id: 1,
                type: 'Joy',
                instances: [
                    {
                        adjustedEnd: '0:06:46.15',
                        adjustedStart: '0:06:42.086',
                        confidence: 0.6808,
                        end: '0:06:46.15',
                        start: '0:06:42.086'
                    }
                ]
            },
            {
                id: 2,
                type: 'Sad',
                instances: [
                    {
                        adjustedEnd: '0:10:18.957',
                        adjustedStart: '0:09:59.306',
                        confidence: 0.8383,
                        end: '0:10:18.957',
                        start: '0:09:59.306'
                    }
                ]
            }
    ];

    // Using raw topics data, with 3 topics.
    const topicsList: ITopic[] = [
            {
                confidence: 0.7577,
                id: 1,
                name: 'Brand Audit',
                referenceId: 'Brand Audit',
                language: 'en-US',
                instances: [
                    {
                        adjustedEnd: '0:01:52.838',
                        adjustedStart: '0:00:13.712',
                        end: '0:01:52.838',
                        start: '0:00:13.712'
                    },
                    {
                        adjustedEnd: '0:03:16.21',
                        adjustedStart: '0:02:08.093',
                        end: '0:03:16.21',
                        start: '0:02:08.093'
                    }
                ]
            },
            {
                confidence: 0.4893,
                iabName: 'News and Politics',
                id: 23,
                instances: [
                    {
                        adjustedEnd: '0:02:59.015',
                        adjustedStart: '0:00:08.421',
                        end: '0:02:59.015',
                        start: '0:00:08.421'
                    }
                ],
                iptcName: 'Politics/election',
                language: 'en-US',
                name: 'Political Campaigns and Elections',
                referenceId: 'Politics and Government/Political Campaigns and Elections',
                referenceType: 'VideoIndexer'
            },
            {
                confidence: 0.6453,
                iabName: 'Business and Finance',
                id: 14,
                instances: [
                    {
                        adjustedEnd: '0:02:37.644',
                        adjustedStart: '0:00:00',
                        end: '0:02:37.644',
                        start: '0:00:00'
                    },
                    {
                        adjustedEnd: '0:04:01.497',
                        adjustedStart: '0:03:39.322',
                        end: '0:04:01.497',
                        start: '0:03:39.322'
                    },
                    {
                        adjustedEnd: '0:05:00.968',
                        adjustedStart: '0:04:36.6',
                        end: '0:05:00.968',
                        start: '0:04:36.6'
                    }
                ],
                iptcName: 'Economy, Business and Finance/business (general)',
                language: 'en-US',
                name: 'Brand Strategy',
                referenceId: 'Business/Product Development/Brand Strategy',
                referenceType: 'VideoIndexer'
            }
    ];

    // Raw VI insights array.
    const rawInsightsData: IVRawIInsightsData[] = [
        {
            rawInsightsKey: 'emotions',
            insightsItems: emotionsList
        },
        {
            rawInsightsKey: 'topics',
            insightsItems: topicsList
        }
    ];

    /**
    *    Using custom insights data
    **/
   // Create a custom data with UI as a capsule.

    // Create a custom element with name 'custom element 2', that has 4 instances.
   const customElement2 : ICustomElement = {
        id: 1,
        text: 'Custom element 2',
        instances: [
          {
            adjustedEnd: '0:00:12.44',
            adjustedStart: '0:00:11.54',
            end: '0:00:12.44',
            start: '0:00:11.54'
          },
          {
            adjustedEnd: '0:05:27.96',
            adjustedStart: '0:05:19.89',
            end: '0:05:27.96',
            start: '0:05:19.89'
          },
          {
            adjustedEnd: '0:02:06.443',
            adjustedStart: '0:02:00.83',
            end: '0:02:06.443',
            start: '0:02:00.83'
          },
          {
            adjustedEnd: '0:03:45.44',
            adjustedStart: '0:03:43.21',
            end: '0:03:45.44',
            start: '0:03:43.21'
          }
        ]
      };

    // Create a custom element with name 'custom element 1', that has 3 instances.
      const customElement1 : ICustomElement = {
        id: 1,
        text: 'Custom Element 1',
        instances: [
          {
            adjustedEnd: '0:02:37.644',
            adjustedStart: '0:00:00',
            end: '0:02:37.644',
            start: '0:00:00'
          },
          {
            adjustedEnd: '0:04:01.497',
            adjustedStart: '0:03:39.322',
            end: '0:04:01.497',
            start: '0:03:39.322'
          },
          {
            adjustedEnd: '0:05:00.968',
            adjustedStart: '0:04:36.6',
            end: '0:05:00.968',
            start: '0:04:36.6'
          }
        ]
    };

   // Create the custom data element, with title 'My data', controlled by all and captioning presets, from type capsule, with 2 elements.
   const customCapsuleData: ICustomData = {
        title: 'My Data',
        key: 'myData',
        presets: ['all', 'captioning'],
        type: 'capsule',
        items: [customElement, customElement2]
    };

    // Create custom color element, with text 'My Custom color Element!', with blue color and 3 instances.
    const customColorElement : ICustomColorElement = {
        id: 1,
        text: 'My Custom color Element!',
        color: 'blue',
        instances: [
          {
            adjustedEnd: '0:02:37.644',
            adjustedStart: '0:00:00',
            end: '0:02:37.644',
            start: '0:00:00'
          },
          {
            adjustedEnd: '0:04:01.497',
            adjustedStart: '0:03:39.322',
            end: '0:04:01.497',
            start: '0:03:39.322'
          },
          {
            adjustedEnd: '0:05:00.968',
            adjustedStart: '0:04:36.6',
            end: '0:05:00.968',
            start: '0:04:36.6'
          }
        ]
    };

    // Create custom color element, with text 'Second custom Color Element', with darkmagenta color and 1 instance.
    const customColorElement2 : ICustomColorElement = {
        id: 2,
        text: 'Second custom Color Element',
        color: 'darkmagenta',
        instances: [
          {
            adjustedEnd: '0:06:46.15',
            adjustedStart: '0:06:42.086',
            end: '0:06:46.15',
            start: '0:06:42.086'
          }
        ]
      };

    // Create custom color element, with text 'customColorElement3', with #FFFFF color and 1 instance.
    const customColorElement3 : ICustomColorElement = {
        id: 3,
        text: 'customColorElement3',
        color: '#FFFFF',
        instances: [
          {
            adjustedEnd: '0:10:18.957',
            adjustedStart: '0:09:59.306',
            confidence: 0.8383,
            end: '0:10:18.957',
            start: '0:09:59.306'
          }
        ]
      };

    // Create the custom data element, with title 'My color', controlled by all and accessibility presets, from type color-map, with 3 elements.
    // The custom data element will be sorted by the provided name, desc.
    const customColorData : ICustomData = {
        title: 'My Color',
        key: 'myColor',
        presets: ['all', 'accessibility'],
        type: 'color-map',
        sortedBy: {
            order: 'desc',
            property: 'name'
        },
        items: [customColorElement, customColorElement2, customColorElement3]
      };

    const customDataList : ICustomData[] = [customCapsuleData, customColorData];

    const config : ICustomInsightsWidgetConfig = {
        duration: 634, // Video duration - mandatory parameter
        accountId: viAccountID, // VI account ID. Should be provided only if using data from VI.
        videoId: viVideoID,  // VI video ID. Should be provided only if using data from VI.
        viInsightsKeys: viInsightsKeys, // VI insights key list. Mandatory parameter. If you don't want to use data from VI, send an empty array.
        rawInsightsData: rawInsightsData, // raw VI insights array. Mandatory parameter. If you don't want to use raw data, send an empty array.
        customData: customDataList,  // custom data array. Mandatory parameter. If you don't want to use custom data, send an empty array.
        preset: 'all' // select preset 'All'
    };

    this.customInsightsWidget = new CustomInsightsWidget(
        'container',
        {
            width: 800,
            height: 1800
        },
        config
    );

    this.customInsightsWidget.render();
最后的见解是:

我们能找到更多例子 官员 GitHub。 。 。 .
启用自定义样式以满足您的应用程序外观和感觉
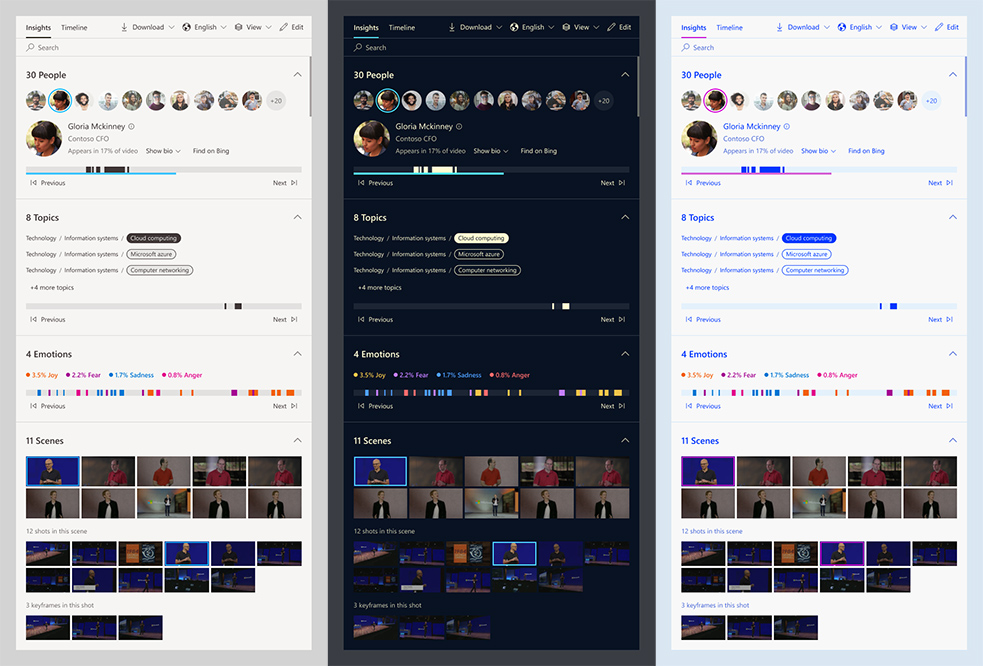
两个部件都支持自定义用户界面颜色. 您可以发送自己的彩色调色板,选择VI主题中的一个,或者选择默认主题并自定义部分颜色.
要执行您应当作为配置对象的一部分发送 a style 类型对象 IInsightsStyle。 。 。 .
请审查一下我们 官员 GitHub 查找更多关于所涉界面和课程的信息.
代码样本数字 :
下面的打字符示例创建了带有"Dark"主题的透视部件,并更改了两种颜色.
    import {
        IInsightsWidgetConfig,
        InsightsWidget,
        IBaseStyleConfig,
        IWidgetStyle
    } from '@azure/video-indexer-widgets';

    // Change two colors of the base style config
    const insightsStyleConfig : IBaseStyleConfig = {
        primary: 'yellow',
        dividers: 'rgba(134,28,173,1)'
    };

    // Select dark mode theme and send new style
    const style: IWidgetStyle = {
        customStyle: insightsStyleConfig,
        theme: 'Dark'
    };
    const config: IVIInsightsWidgetConfig = {
        accountId: '<ACCESS-TOKEN>',
        videoId: '<VIDEO-ID>',
        accessToken: '<ACCESS-TOKEN>',
        style: style
    };

    this.insightsWidget = new InsightsWidget(
        'container',
        {
            height: 780,
            width: 580
        },
        config
    );

    this.insightsWidget.render();
商标
本项目可能包含项目,产品或服务的商标或标志. 授权使用微软 商标或标志必须遵循 微软的商标和品牌准则。 。 。 . 在这个项目的修改后版本中使用微软商标或标志不得造成混淆或暗示微软赞助. 任何使用第三方商标或标志的行为都必须遵守这些第三方的政策.
行为守则
该项目通过了 Microsoft 开源行为守则。 。 。 . 更多信息见 《行为守则》 或者说 联系人 打开码@ microsoft.com 并附上任何其他问题或评论.